Using Outlook Add-in
Sign In
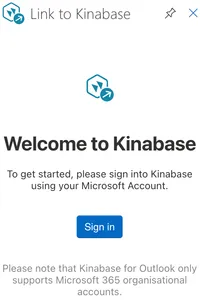
Once you have installed the Add-in, you will need to sign in to Kinabase. This will only need to be done once per device, and will be remembered for future use.
To sign in, press the "Link to Kinabase" button in the Outlook Add-in, and then click the "Sign In" button.
This will open a new window, where you will be asked to sign in to Kinabase.
Using the Add-in
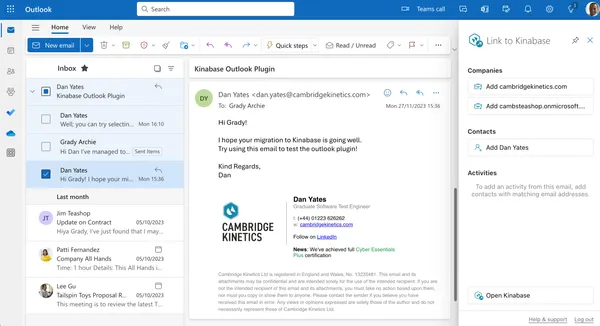
To start using the Outlook Add-in follow these steps:
- When you have an email selected, click the Link to Kinabase button in your toolbar.
- This will open the Add-in pane on the side.
- You can then add a Company, Contact, or Email activity.
Adding an Organisation or Contact
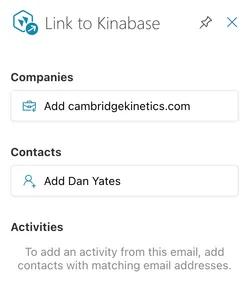
- Select an email
- Press the Link to Kinabase button in the toolbar.
- You will see a sidebar appear on the right hand side of the screen.
- Click the Add Company or Add Contact button to add a Company or Contact to Kinabase.
- Please note that the wording of these buttons may be different depending on how your collections are named.
- This will open Kinabase in your default browser, with the form to add a Company or Contact already pre-filled.
- Add any extra details you need to
- Press "Add" to add the record to Kinabase.
- When you go back to Outlook, click the Done button to continue using the add-in.
- Any added records will display at the bottom of the sidebar, you can quickly get to the record in Kinabase.
Adding an email activity
Logging emails as activities within Kinabase allows you to keep track of communications from one place.
To log an email:
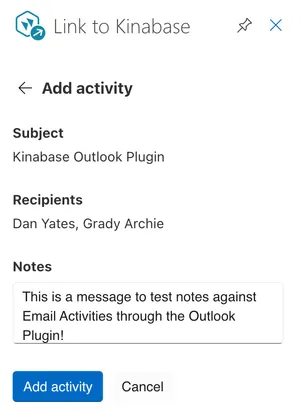
- Select an email in Outlook
- Click the Link to Kinabase button in the toolbar
- Click the "Add email activity" button
- Optionally you can fill in some extra notes or comments about this email.
- Click the "Add email activity" button to add it into Kinabase.
- The Outlook Add-in will show you a confirmation message, and the activity will be added to Kinabase.
If your email is already linked to Kinabase, the add-in will show you a message to let you know.
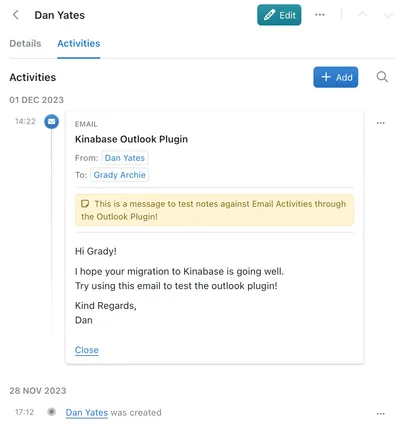
Emails will appear in your Activity timeline in Kinabase, and will be linked to the Contact that sent or received the email. See below for an example of how this looks.
Adding multiple emails at once
The Kinabase Outlook Add-in allows you to select multiple emails at once to add as activities, saving time and effort. It will automatically pick up organisations and contacts based on who the email was sent to and from.
Please note that you can only link multiple emails at once if the contacts already exist in Kinabase.
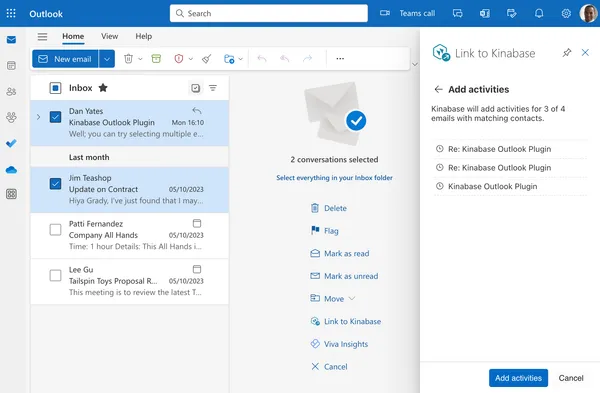
After selecting multiple emails, press "Add activities for selected emails", review the selection, and then press "Add activities" to add them to Kinabase. The progress will be shown on the screen.
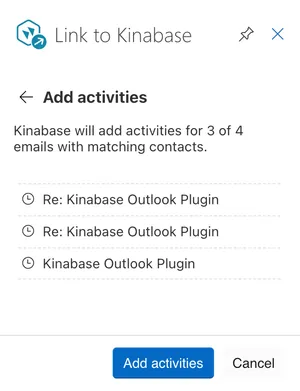
- You are now presented with a list of Emails that will be added as activities to the system.
- If you are not happy with the selection, then begin the process again by un-selecting any unwanted emails.
- Clicking add activities will add all of the emails to Kinabase as activities against the contacts.
For Web / Windows
- To select multiple emails click the box on the left hand side of the email and ctrl+click to add more emails to the selection.
- Click the Link to Kinabase link in the middle of the screen.
For Mac
- To select multiple emails select an email with left click and then cmd+click to add more emails to the selection.
- Click the Link to Kinabase button in the toolbar (it may be hidden in the 3 dots if other options are before it).
