Adding Data into Kinabase
As the amount of data in your Kinabase environment grows, so too will your appreciation of what Kinabase can do for you. Your data is stored as Records that sit within your Collections, these records can carry a significant amount of information relating to the fields that you've chosen for your collection, as well as tasks, activities, and files. For guidance on how to set up your Collections, see the Creating Collections support article.
There are two ways that you can add records into your collections. First, by manually creating them within the collection screen, and second, by importing your data from a .csv file. This article will describe both approaches, but for more advanced guidance, see the following support articles:
Creating Records Manually
The following steps will guide you through manually creating a Record in Kinabase:
- From the left-hand navigation panel on your screen, open the Collection that you wish to add to
- Click on the Add button to the top right of the collection screen
- Fill in the values for each of the fields present in this collection, then select Add to create your new record

Importing Records into Kinabase from a .csv Spreadsheet File
When you come to set up a new Kinabase environment, create a new collection, or populate your existing collections from an external data source, it can be time-consuming and repetitive to recreate all of your existing data by manually creating new records - see Managing Records. The ability to import your data directly into Kinabase from a .csv (Comma-Separated Values) spreadsheet file can make this an instantaneous process.
This article will describe how you can import your data into Kinabase from .csv spreadsheet files. For support with advanced importing and exporting functions, see Advanced Data Import and Export
If you have a spreadsheet or .csv file that you wish to import into a Kinabase collection, this section will guide you through the stages of preparing your file, importing, and troubleshooting your data import.
Preparing the .csv File
CSV, or "Comma-Separated Values" files are the standard file format used by spreadsheet applications like Excel and Google Sheets. If you're trying to import a spreadsheet that you've been using to manage your information in directly, or migrating from another system, follow the steps outlined here.
Preparing your .csv file to be Imported is simple:
- Locate and open the .csv file from your orgnaisation or computer's directory
- Check that there is only one header row, and that it's the first row (Row-1) of the spreadsheet, and that the data you're importing starts from the first column (Column-A)
- Check that the data (not the column titles) that you're importing starts from the second row (Row 2)
- Check that each column in the file has a meaningful title that matches the fields that you have created in your Collection
- Check that the data in each of the columns contains the correct format, so that it matches the field type that was set up in your Collection. This means number fields must contain only numbers, and date fields must be properly formatted in a UK date format

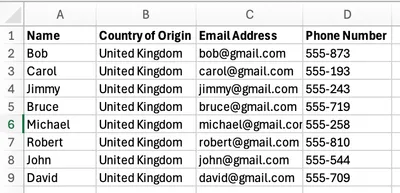
The above is a good example of a well prepared .csv file. The header row contains descriptive titles, the data is in a consistent format, the headers are all in Row-1, and the data to be imported starts from Row-2.
Importing Records from a .csv File
Now that your .csv file is formatted correctly, it's time to import the data into one of your collections:
- Navigate to the collection into which you want to import your .csv file, or Create a New Collection
- Select the Collection Menu dropdown by clicking the (…) in the upper right corner of the window, then select Import (.csv)
- Select the file you wish to import from your computers file directory or drag the file into the import window
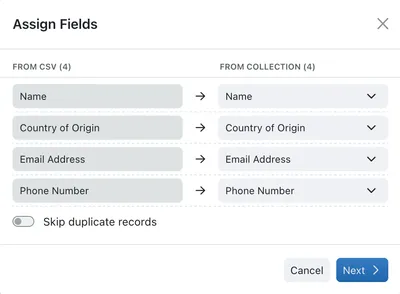
- Map the column names on your imported file to the fields you have set up for your Collection
- Optionally, select Skip Duplicate Records to prevent importing rows from the .csv file that already appear in this collection
- Press Next to import the data


Your collection will now populate with the data from your .csv file - make sure to double-check that all the data from your .csv file has imported correctly into your Collection!
Troubleshooting a Failed Import
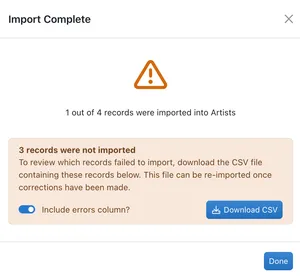
If the data import fails, you will be promted to re-download the .csv file you've tried to import - this .csv file will contain only the records for which an error was detected.

You also have the option to select Include Errors Column, this option will add a new column to your .csv file that describes the error that caused the import to fail.
In this example, one line was successfully imported, but 3 of the 4 lines failed to import because the Country of Origin does not match the values allowed in that field within the collection. "Botswana", "Argentina", and "Hungary" are not countries that appear in the linked "Countries" collection, and hence have returned errors.

To resolve this issue, either the "Country of Origin" values in these lines must be changed, or records for these countries must be created in the "Countries" collection.
If you're still unable to import your .csv file into Kinabase, get in touch with our support team at support@kinabase.com, or call us on 01223 626262