Automations
Streamline Your Workflow
Automations
By defining the 'When → Then' conditions, you can reduce manual work and keep your team in sync.
What are automations?
Automations let you configure trigger events (the 'when') and resulting actions (the 'then'). For example:
- When a new record Recordis added to a 'Maintenance' collection → Then create a task assigned to multiple maintenance staff, or send a notificationAn individual entry within a Collection, like a row in a database table, representing one item or entity.NotificationA reminder sent by Kinabase to inform you about events, such as changes to a Record or upcoming tasks.
- When a workflow WorkflowstageA defined sequence of stages and actions that a Record passes through, often representing a business process.Stagechanges to 'Approved' → Then generate a new record in another collection, or send an email alertA step in a Workflow that a Record moves through, illustrating its current status in the process.
Benefits of automations
- Automate routine tasks like creating follow-up tasks or notifications
- Make sure boring administration tasks are never missed
- Standardise processes and reduce manual steps
- Keep everyone informed with automated alerts or tasks
- Add new automations as your organisation's needs evolve
Setting Up an Automation
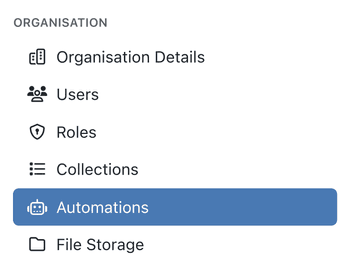
1. Access Automation Settings
- Open Settings: Click your name in the bottom-left corner of Kinabase
- Select Automations: Under Operations, choose Automations
- Add New Automation: Click + Add Automation in the top-right corner
- Name & Description: Give your automation a clear name (e.g., 'Notify Finance on New Invoices') and a brief description
2. Define the 'When' Condition(s)
This is your 'Trigger' - when this happens, the automation runs.
You have lots of options for trigger events, for instance:
- A record is added to a specific collection
- A record is updated (general or a specific field)
- A record is right-clicked (context menu)
- A record becomes due (if you have a date field in your record)
- A record changes workflow stage
Pick your trigger event from the dropdown menu.
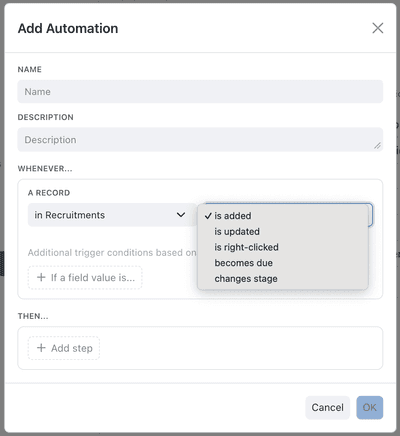
You can also set Additional Trigger Conditions based on field values using the 'If field value is...' option.
Additional trigger conditions allow you to refine when automations run:
- Define 'If' conditions with both '+And' and '+Or' criteria
- Use previous field values to trigger on changes (e.g., 'Previous Status' is 'Pending' and 'New Status' is 'Approved')
- Use field character length for text fields
- For example, 'Only if priority equals High and Company is XYZ'
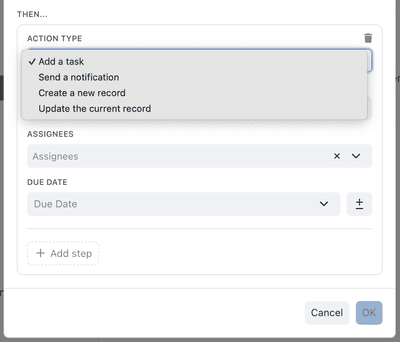
3. Set the 'Then' Action
Once you define the trigger, choose what Kinabase should do automatically from the Action Type dropdown:
- Add a Task: Create and assign tasks, optionally setting due dates or multiple assignees
- Send a Notification: Choose recipients and urgency (Urgent, High, Medium, Low)
- Create a New Record: Specify a target collection and fill out relevant fields
- Update the Current Record: Change fields in the same record that triggered the automation
- Update portal access: Automatically invite, grant, or revoke portal Portalaccess for external userA secure, branded web interface you create to share selected data and forms with external collaborators.External UserrecordsA user granted limited access to a Portal or specific data, often customers or partners.
- Send an Email: Send automated emails to specified recipients
- Generate PDF Document: Create PDF documents from templates
- Call External API: Send data to external systems via webhooks
- Create in accounting system: Automatically create a contact or product in Xero or QuickBooks and link it back to the record
You can add multiple steps to the same automation - e.g., first send a notification, then create a new record, then add a task.
4. Save & Activate
- Click 'OK' to finalise your automation
- It takes effect immediately; any new triggers will now run the automation steps you defined
Action Options
Kinabase has a variety of action types to choose from when setting up your automations. Each action type has its own configuration options to tailor the automation to your needs.
Advanced Automation Features
Multiple Steps & Conditions
Enable a cascade of action steps based on your conditions and logic:
Adding Steps: Create multiple follow-up actions. For example, after adding a task, you could also send an email notification to a manager.
Filters & Conditions: Some triggers allow you to refine when an automation runs (e.g., only if a certain field equals 'High Priority').
Conditional & Filter Configuration
You can apply detailed filter conditions to make multi-step automations more precise, including record-copy scenarios.
For Create a New Record steps using Related Record Copying, configure filters so only matching source records are copied:
- In a Create a New Record step, scroll to Related Record Copying and choose your source and target collections.
- Click Add filter under the source collection and link field selectors.
- Build conditions by selecting a source field, operator, and value.
- Add additional conditions with And or Or if as needed.
- Save the automation; only records matching the filter will be copied when it runs.
The step summary shows a plain-English filter description, making it easier to review what the automation will copy.
Note: conditions that depend on the current user are not available here, because automations may run without a logged-in user context.
Browse our Product Updates for the latest release notes on automation filters.
Preview Automations
Some workflow stages allow you to preview which automations will run. This ensures you have full clarity on what will happen next.
Use this preview feature to confirm tasks, notifications, or record changes before finalising an action.
Assign Tasks to Multiple Users
When adding an 'Add a Task' step, you can select multiple owners. All assigned users will be notified and see the task in their dashboard
AI-Generated Descriptions
You can generate a human-readable description for any automation using AI. In the automation editor, a bolt icon appears beside the Description field. Click it, and Kinabase analyses the automation's trigger, steps, field assignments, and conditions to produce a concise summary in plain English. The description is written for a general audience, so anyone on your team can understand what the automation does without reading through every step.
The AI considers the full configuration when generating a description, including:
- Trigger type — what event starts the automation and which collection it applies to
- Step details — the type of each action (e.g. create a record, add a task, send a notification, send an email, generate a PDF, call an external API)
- Field assignments — which fields are set and how their values are determined (copied from another field, set to a fixed value, or calculated from an expression)
- Conditional logic — any if/else branches and the conditions that control which steps run
The bolt icon only appears when the automation has a valid trigger and no configuration errors. If you do not see it, check that your trigger and steps are fully configured.
You can edit the generated description, regenerate it after making changes, or replace it with your own text at any time.
Read our Product Update for more details.
CSV Import Preflight Warnings
When importing records via CSV, some automation steps — such as Create in accounting system — are automatically skipped to prevent flooding external systems. Kinabase shows a preflight warning during the import process that lists exactly which automations will be paused.
The warning appears on the field assignment screen with the message: "For this import, these automations will be skipped", followed by a list of affected automation names. Your CSV data import will still complete normally.
Linked Records
You can copy parent-record values automatically in automation field mapping.
When creating or editing an automation, you can set fields in the new record to pull values from the triggering record or other related records:
- In the Automation Editor, add or open a Record step that targets a sub-record collection
- In Field assignment, click the "Copy from parent" option next to any mappable field
- Choose the parent field you want and Save – Kinabase will use that value every time the step runs
Read our Product Update for more.

Rating Labels in Automations
When a rating field has configured text labels, automations can copy the label text instead of the raw number.
- In an automation step that creates or updates a record, select a text field as the assignment target.
- Open the assignment dropdown — you will see label options (such as "Copy Collection's Priority's label") alongside the standard field options.
- Choose the label option to copy the label text (for example, "High" or "Medium") into the text field.
This works for fields on the current record, previous automations, form submissions, and lookup fields on linked records. If a rating value has no matching label, the numeric value is used instead.
You can also use rating labels in expressions with the syntax $FIELD_NAME.LABEL. See Computed Fields for more on expression syntax.
Read our Product Update for more details.
Record Context Switching
By default, each action step in an automation operates on the record that triggered it. With record context switching, you can make any step act on a different linked record instead. You can chain multiple switches together to navigate across collections, and each step clearly shows which record it will act on.
How to switch records
- In the automation editor, add or edit an action step (such as Update Record or Send Email).
- Click the collection name button in the step header — it shows the collection the step currently acts on.
- Click Switch record in the popover to open the context switch editor.
- Click Switch record at the bottom of the chain to add a switch. Choose Select a new record to navigate to a linked record, or Select a previous record to return to an earlier context in the chain.
- For linked records, choose the collection and linking field. If multiple linked records exist, set Selection Criteria to pick the right one (for example, Earliest or Latest for dates, Min or Max for numbers).
- Click Apply to confirm. The step now operates on the new record.
When assigning field values in any step, you can copy from any context in the chain — the original trigger record, any intermediate records, form inputs, or API responses.
Example use cases
- A purchase order is approved → switch to the linked supplier to update their order count → switch back to send a confirmation email referencing both records
- A deal closes → switch to the linked company to update total revenue → switch to the primary contact to send a personalised message
- A project status changes → switch to each linked deliverable to update deadlines → return to the project to log the changes
Read our Product Update for more details.
Running Automations on Multiple Records
Context menu automations can be run on multiple records at once, allowing you to process batches of data in a single action rather than clicking through each record individually.
How to run automations on multiple records
- Navigate to a collection and select multiple records using checkboxes or Shift-click to select a range
- Right-click to open the context menu and look for your automation under the available actions
- Review the preview modal, which shows:
- Records selected: Total number of records you've selected
- Will run: Records that match your automation's filter criteria
- Filtered out: Records excluded based on your automation's conditions
- Click Run to execute the automation across all matching records
- Review the results summary showing how many records completed successfully, failed, or were filtered out
Important notes
- Multi-record automations are available only for automations configured with a right-click trigger
- The preview helps you understand how many records will be processed before you commit
- Any failures display the record name and error message in the automation history for easy troubleshooting
- Multi-record automations are available on Pro, Charity, and Enterprise plans
Browse our Product Updates for the latest release notes on multi-record automations.
Skip Confirmation for Right-Click Automations
By default, running a right-click automation shows a Preview Automation dialog where you review the steps before clicking Continue. For automations you run frequently and trust, you can skip this confirmation step so the automation executes immediately.
How to configure
- Open the automation editor for a right-click automation (trigger set to "is right-clicked")
- In the Require Confirmation section, find the Confirm before running checkbox
- Uncheck it to skip the Preview Automation dialog
- Save the automation
When a user right-clicks a record and selects this automation, it runs immediately without showing the preview dialog.
Important notes
- The Confirm before running checkbox only appears for manual, right-click triggers
- It is checked by default, so new automations always require confirmation
Read our Product Update for more details.
Viewing & Editing Automations
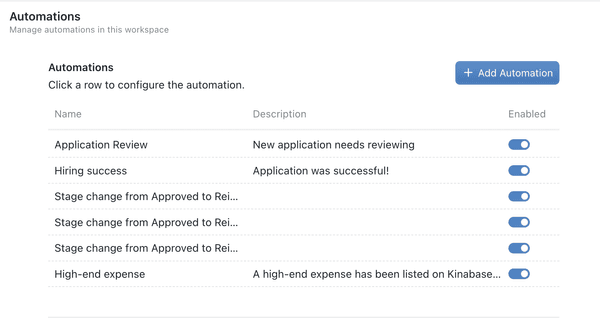
Edit or Deactivate: If you need to pause or change an automation, open it from the Automations list and modify or toggle it off.
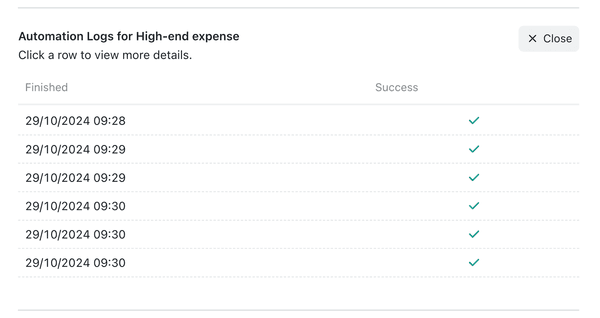
View History Logs: Right-click and edit an automation. Select the History tab to see a log of each time it's been triggered and the outcome. You will also find statistics on how many times it has run successfully or failed.
View Schedule: If your automation is based on times and dates, you can see when it is next scheduled to run in the 'Scheduled' tab.
Best Practices
Automations can be very useful, but can become overly complicated if you're not careful. Follow the guidance below to get the most out of them:
Start with a minimal number of automations. Overcomplicating from the get-go can lead to confusion.
Clear automation names help your team understand their purpose straight away.
Check automation logs periodically to ensure everything is running smoothly.
Automations work great with workflows - when a record moves to a certain stage, let an automation handle the follow-up tasks.
Using Automations in Kinabase saves time and maintains consistency for your team, letting them focus on the tasks that matter most.
If you need more help or have advanced scenarios in mind, check out our other guides or contact our Support Team.