Configuring Fields
How to set up and manage fields in your collections
Fields
Once you've added fields to your collections, you can refine their settings. You can also add new fields and remove any outdated ones.
1. Accessing Field Settings
1. Open the Collection
Select the collection from the sidebar.
2. Go to 'Configure'
- Click the ⋯ (options menu) in the top-right corner and select Configure, or
- Right-click on the collection name in the sidebar and choose Configure.
3. Select 'Fields'
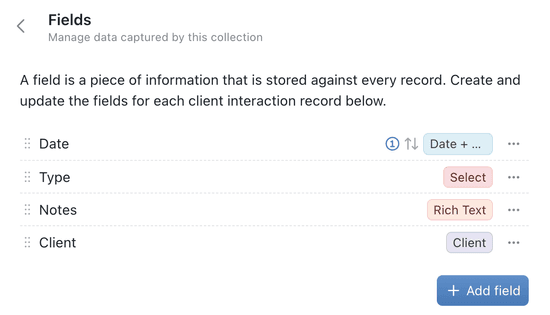
Under setup, click 'Fields' to see all existing fields.
You'll need Configure permissions
Permissionto adjust collection settings.A specific right to view, edit, delete, or administer parts of Kinabase, granted via Roles.
If you're unsure, ask your System Admin.
2. Creating a New Field
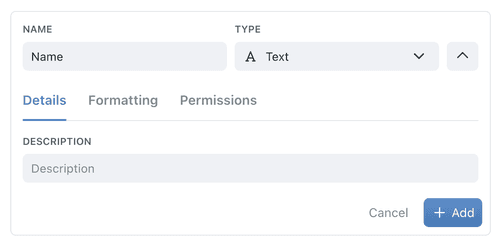
1. Click '+ Add Field'
- Provide a Field Name (e.g., 'Status', 'Budget') and,
- Pick a Field Type (text, number, select, etc.).
When creating a new field, Kinabase will suggest a field type based on the name you give it. This can help speed up your configuration.
2. Optional Settings
- Description: Add context for teams. Descriptions are available for all field types, including aggregations, lookups, and computed fields.
- Default Value: Auto-fill data when creating new records Record(for date, number, or select fields).An individual entry within a Collection, like a row in a database table, representing one item or entity.
Tip: You can use AI to generate field descriptions automatically. See the Adding descriptions section below.
3. Save
Click Add Field again to confirm. You'll see the new field listed in the Fields pane.
3. Adding Descriptions
Field descriptions help your team understand what each field represents, especially for complex calculated fields. All field types now support descriptions, including aggregations, lookups, and computed fields.
Adding a description manually
- Edit any field and expand the form to see all tabs.
- Go to the Details tab.
- Enter a description in the Description field.
- Save your changes.
Using AI to generate descriptions
For complex fields like aggregations, lookups, and computed fields, AI can generate clear descriptions automatically:
- Edit a field and go to the Details tab.
- Click the bolt icon next to the Description field.
- AI analyses the field's configuration and generates a plain-language explanation.
- Review the suggested description and save your changes.
Note: The AI generation button only appears for collections that have been saved. If you're setting up a new collection, save it first before using AI descriptions.
4. Reordering or Deleting Fields
Reordering
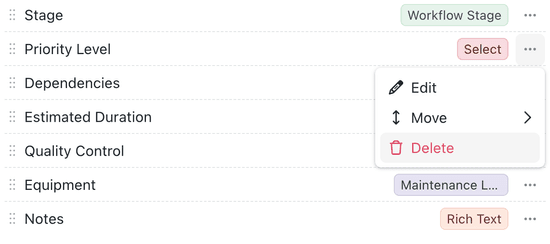
- Hover over the ⋮⋮ drag handle (often next to the field name) and move the field up or down, or
- Click the ⋯ menu on a field and choose Move Up or Move Down.
Deleting
- Click the ⋯ menu on the field and select Delete Field.
- Note: This is permanent and erases all data in that field. You cannot delete primary or secondary fields Secondary Field.An optional Field that provides additional identification or context for a Record, shown alongside the Primary Field.
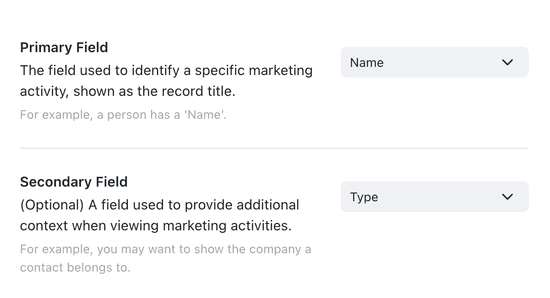
5. Setting Primary & Secondary Fields
- Locate 'Primary Field' and 'Secondary Field' in the Fields pane.
- Select Your Preferred Fields from the drop-downs.
- Primary Field: The main identifier for records (mandatory).
- Secondary Field: An optional subtitle or extra reference for quick scanning.
6. Using Default Values
For certain fields (like date, select, or number), you can set a default value:
- Add or Edit the field in the Fields pane.
- Enter the Default Value (e.g., "Open" for a Status field, or "Today" for a Date field).
- Save and test by creating a new record—your default should appear automatically.
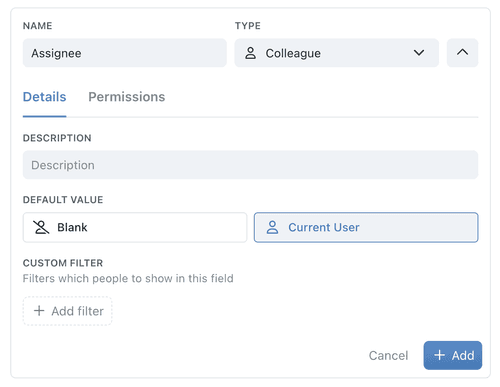
Please Note: You can set default Date Values to offset from the current date/time when creating or editing a record. Use "Now + Offset".
See our Product Update for more.
7. Using the Display Setting
Control how certain field types look in record views without touching the data itself.
Select fields
- Open a Select field and look for the Display setting.
- Choose Display as… – you'll have three options:
- Badge – the default coloured pill.
- Text – plain label, no colour.
- Progress – renders each option as a numbered shape (circles, squares, or steps) so the field doubles as a lightweight progress bar. When you pick Progress you can also choose the Symbol style and preview the result. Supports up to 7 ordered options.
- Preview – the right-hand pane updates live so you can confirm the look.
- Save – the change is purely visual; underlying values stay intact.
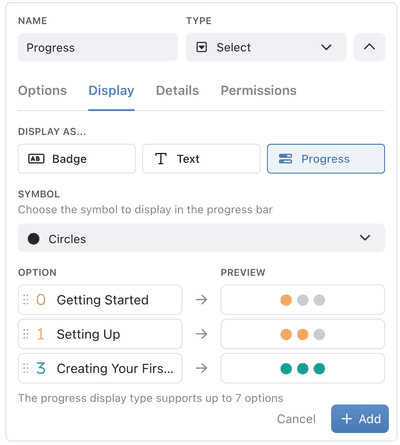
Use Progress on ordered options (e.g., Not Started → In Progress → Done) for an instant progress indicator without building a separate workflow.
Website fields
Website fields also support a display setting to control how links appear on record details pages:
- Open a Website field and look for the Display setting.
- Choose Display as… – you'll have two options:
- Preview Card (default) – shows a rich link preview with the site's image, title, description, and favicon.
- Simple Link – displays a compact, clickable URL that takes up just a single line.
- Save – the change applies to all records in the collection.
Use Simple Link when you have many website fields on a record and want to reduce visual clutter. Keep Preview Card for important links where the context is valuable.
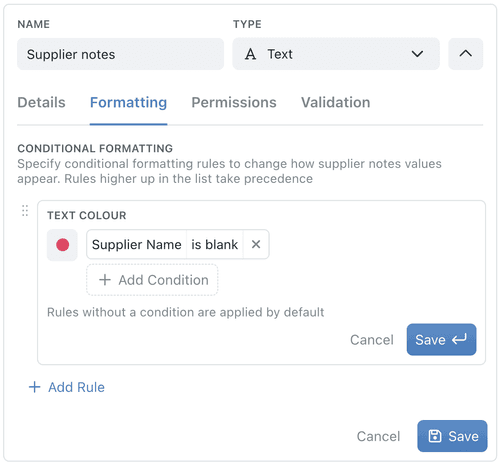
8. Using the Formatting Tab
In Excel you might use conditional formatting; in Kinabase, it's just Formatting. Give any plain field instant visual cues by adding conditional formatting colour rules - no formulae required.
Why use conditional formatting?
- Quality control - highlight missing or invalid values (e.g., blank Supplier Name turns any supplier notes red).
- Risk & priority - surface high-risk scores, overdue dates or negative balances at a glance.
- Context cues - brand-colour key clients, shade equipment types by category, or simply make your busy collections easier to scan.
Which field types are supported?
You can add formatting rules to most plain data types:
| Works on | Doesn't work on |
|---|---|
| Text, Number, Currency, Percentage, Probability, Probability, Yes/No, Date, Email, Phone, etc. | Rich-text, Computed fields, Linked-collection fields, Files & Images |
Adding the colour rules
- Open the field
- Edit the field and switch to the Formatting tab.
- Add rule
- Click + Add Rule → Text Colour, then pick a colour swatch.
- Build the condition with dropdowns:
- Field → operator (e.g. is blank, contains, is) → (optional) value.
- Combine logic (optional):
- Add Condition inside the rule for AND/OR logic.
- Add multiple rules per field and drag to reorder; first match wins.
- Default style (optional)
- A rule with no condition becomes the fallback colour.
- Save
- Your collection updates instantly; new and existing records follow the rules.
As well as conditional formatting, you can set formatting of large numbers.
Formatting large numbers
You can add formatting rules to large numbers, to consistently present big values for greater clarity.
First edit any Number field then open the Formatting tab.
Format your large numbers - choose from:
- Thousand(s) Comma separator (1,234)
- Scientific (1.23x10³)
- Suffixes (1.23k or 1.23M)
Save and watch every view, aggregation and chart update instantly.
Read our Product Update for more on formatting large numbers.
9. Using the Permissions Tab
For all fields, you can set field-level permissions to control who can view or edit them.
- Read permissions: define who can see the field: choose from 'Everyone', 'By role', or 'Custom'.
- Write permissions: define who can edit the field: choose from 'Everyone', 'By role', or 'Custom'.
- Override permissions: (for computed fields only) allow users to bypass computed fields or formulas and edit them directly.
Use custom permissions to filter by specific user-related fields.
10. Using the Validation Tab
For some field types, you can set field-level validation settings - to ensure data integrity and consistency.
- Required: Make the field mandatory when creating or editing a record.
- Unique: Ensure each record has a distinct value in this field; you have options to just show a warning, or show an error message & prevent the user from saving the record unless this record is filled.
- Whole Number: For numeric fields, restrict input to whole numbers only.
- Min/Max Values: For numeric fields, set minimum and/or maximum allowable values & messages to display to the user.
Additional Guidance
Tips from our team
- Only create the fields you really need and will use. You can always add more later.
- Make sure critical data is marked as a mandatory field, either via field settings or validation rules.
- Outdated fields can clutter your records - remove them if they no longer serve a purpose.
- Get feedback on naming, default values, and whether the primary or secondary fields make sense.
- Create views Viewto filterA customised display of Records in a Collection, defined by filters, sorting, grouping, and visible Fields.Filteror sort by specific fields, especially if you have many fields in a collection.A set of conditions applied to a Collection or View to narrow down which Records are displayed.
- Colour rules turn any collection into a quick-read dashboard - great for catching errors, guiding workflows or reinforcing brand identity.
- Use AI-generated descriptions to document complex aggregation, lookup, and computed fields for your team.
By configuring fields thoughtfully, you'll maintain clean, relevant data and keep your Kinabase collections efficient for everyone. If you have questions, reach out to your System Admin or search in Help & Support.