
Collection Lists
Organise complex data inside a record with inline lists of related items
**Collection List
Each list has its own fields and calculated fields, and every action you take on the main record (duplicate, delete, restore) can include its list items. A list can also have Type
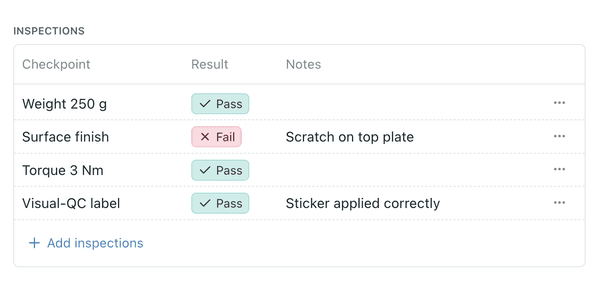
1. Accessing the lists configuration
1. Open collection configuration
Go to the collection in the sidebar. Right-click it, or click the options menu (⋯), and select Configure.
2. Select Lists
This tab shows any existing lists and lets you add, remove, or edit them. Lists are hidden from the main navigation, so you'll only see them here or inside a record.
2. Creating or editing a list
1. Add a list
Click Add under Lists. Give the list a Name (e.g. Line Items, Components). Kinabase automatically labels each list item for you - no manual setup required.
2. Define fields
Add standard or calculated fields that belong exclusively to the list. Required fields in the collection stay required across every list.
3. Need unique IDs? Use a child collection
A list doesn't have identifiers. If each item needs its own ID, use a child collection instead and set Identifiers on its Details pane.
Read more about adding unique identifiers.
4. Save
Click Save to confirm. The list now appears under the Lists tab and inside each record.
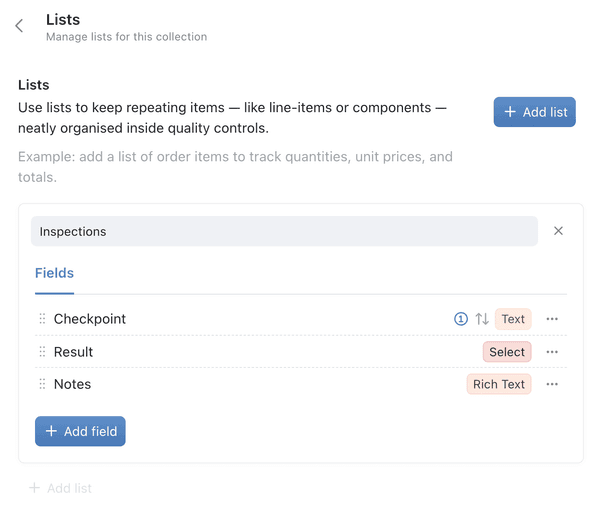
5. Set the row order
Once the list has been saved, click Edit on it. On the Fields tab, under Sorting, select the Sort Field - for example a due date or a value - and turn on Invert Sort Direction to reverse the order. Click Update. Select Created At to keep rows in the order they were added.
Rows on the record, and on the printed record, follow this order, and a row you add or edit moves straight into place. Clicking a column header re-sorts only the table you're looking at, and isn't saved.
Read our Product Update for more.
6. Give a list types (optional)
Once the list has been saved, click Edit on it and open the Types tab. Click Add type, name the type and tick its fields. Type lifecycle and Required work as they do on a collection - see Types on lists and child collections.
Read our Product Update for more.
3. Choose where a list shows
By default, a list shows on the record's Details tab and when you add or edit a record. You can hide it from either, or show it only for particular types or workflow stages. The Visibility tab appears once the list has been saved.
- Open Configure and select Lists.
- Click Edit on the list and open Visibility.
- For Details and for Forms, select Hidden, Shown or Custom.
- If the list has types, tick A table for each type of followed by the list's name, for example A table for each type of part, to give each type its own section. Leave it unticked to keep one shared table.
- Click Save.
- Hidden on Details takes the list off the Details tab, but it's still included when you print the record.
- Hidden on Forms leaves the list out when you add or edit a record. People add rows from the list's heading on the Details tab instead.
- Custom appears when the collection has types or a workflow. Click Add condition to show the list only for a particular type, workflow stage, or both.
This is the only place to set where a list shows - editing a type or a stage doesn't change it. An eye icon on the list's row shows when it's hidden or limited. The same choices are available for a field group; see Organise fields into groups.
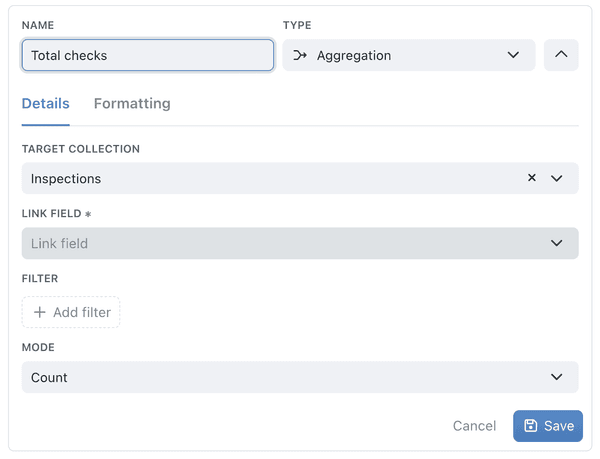
4. Using lists in aggregations
- Open collection configuration and select Fields.
- Click + Add Field and select Aggregation.
- Open the dropdown for Target Collection and select your collection list.
- Select a link field from your collection list.
- Add any filters and the mode for your aggregation (e.g. Count, Sum, Average).
- Click + Add, then refresh your collection to see the new values.
Read more on Computed Fields.
5. Working with list items in a record
- Open any record and scroll to the inline table that represents the list.
- Add, edit, or delete items directly in the table or via the full-screen form. If the list has types, the form asks only for that type's fields. In a shared table, use the menu beside Add to add a row of a particular type; in a section per type, that section's Add, Import (.csv) and Export (.csv) stay with its type.
- Duplicate a list item - right-click any item and select Duplicate to open an add form pre-filled with the original values. Adjust what you need and save as a new entry. File attachments aren't copied.
- See roll-ups refresh instantly - totals, averages, or status indicators recalculate as soon as you change a list item.
- Bulk actions on list items - use checkboxes to select multiple items, then right-click for bulk operations:
- Edit multiple - change a field value across all selected items at once.
- Delete - remove multiple items in one action. A confirmation modal explains the 30-day recovery window.
- Export (.csv) - download selected items to CSV.
Bulk Delete requires the Bulk Delete permission to be enabled in your role settings.
- Record actions (duplicate, delete, restore)
- Duplicate a record - Kinabase duplicates all its list items.
- Delete a record - list items are deleted too, and appear in Recently Deleted under their own tab.
- Restore a record - Kinabase restores all list items, keeping their links intact.
6. Turning a list into a child collection
Most lists work well embedded inside their parent record. If a list's items need their own page, their own search, or a permanent place in the sidebar, you can convert it into a Child Collection
1. Open collection configuration
Go to the collection in the sidebar, right-click it or click the options menu (⋯), and select Configure, then select Lists.
2. Create or convert
Select Add under Child collections to create one from scratch, including its initial fields. To convert an existing list instead, open its menu and select Convert to child collection, then confirm.
3. Find it in the sidebar
A child collection appears nested beneath its parent collection in the sidebar. Each item gets its own collection and record pages, and stays linked back to its parent record.
Its table on the parent record follows the child collection's own Sorting, set from its Configure screen under Fields - see Primary, Secondary, and Sort fields.
Existing items in a converted list remain available, and the field linking each item to its parent cannot be removed, redirected, or made optional.
To choose where its table shows on the parent record, see Choosing where a child collection shows.
Read our Product Update for more.
7. Choosing where a child collection shows
A child collection's table sits on its parent record. You can choose whether it shows on the parent's Details tab and when you add or edit the parent record, or only for particular types or workflow stages. The child collection's own page stays available, so people can still open and add those records there.
You'll need Configure Permission
Permissionfor the parent collection. If you're unsure, ask your System admin.The level of access — No Access, View Only, View & Edit or Not Enabled — granted through a Role for a specific area of Kinabase, such as records, tasks or configuration.
1. Open Visibility
Open the parent collection, click the options menu (⋯) and select Configure. Under Setup, select Lists. Under Child collections, click the three-dot (⋯) Menu button on the child collection's row and select Visibility.
2. Set Details and Forms
For Details and for Forms, select Hidden, Shown or Custom. If the child collection has types, you can also tick A table for each type of followed by its name. Click Save.
- Hidden on Details takes the table off the parent's Details tab. It's still included when you print the parent record.
- Hidden on Forms leaves the table out when you add or edit the parent record. People add those records from the parent's Details tab, if the table shows there, or from the child collection's own page.
- Custom appears when the parent collection has types or a workflow. Click Add condition to show the table only for particular types or stages of the parent record. If you add several conditions, all of them must match.
On the Lists page, an eye icon on the child collection's row shows that its table is hidden or limited. Editing a type or a stage doesn't change this setting.
Read our Product Update for more.
8. Importing and exporting
Kinabase has intuitive importing and exporting functionality for list items, just as it does for top-level records, using the same column headings. See How CSV columns are named.
Menu → Import (.csv) → select the target list.
List menu → Export (.csv).
Add list records in bulk using the list's own collection ID through the Kinabase API.
Read our guidance for more on importing & exporting.
Utilising lists effectively
Collection lists are a powerful way to keep your data organised and exactly where you need it. Use them for order line items, quotes, or parts on a bill-of-materials.
Need more help? Ask your System admin, or contact our support team via Help & Support.