Assign Roles & Permissions
Managing User Access
As your Kinabase workspace grows, it's important to decide who should be able to see or edit which parts of your data.
Roles
1. Creating or Editing Roles
In Kinabase, Roles
For instance, you might have 'Sales', 'Engineer', or 'Manager'.
These roles do not override whether someone is a System Admin or Billing admin - they're simply a way to define day-to-day permissions in your organisation.
Remember: You can assign colleagues multiple roles. This is especially useful for team members who straddle multiple teams.
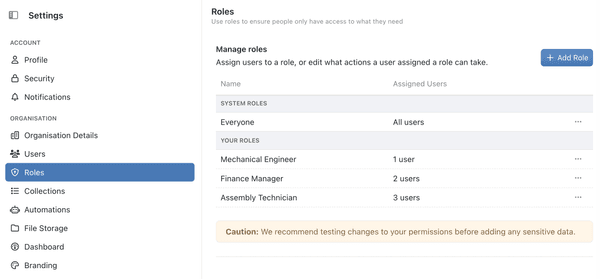
To manage roles, go to Settings → Organisation → Roles.
Add a New Role
Click + Add Role, give it a name and description (e.g., 'Sales Team'), and (optionally) assign existing users.Manage Existing Roles
Use the (⋯) menu next to a role name to rename it, add/remove users, or duplicate/delete it.
2. Setting Permissions
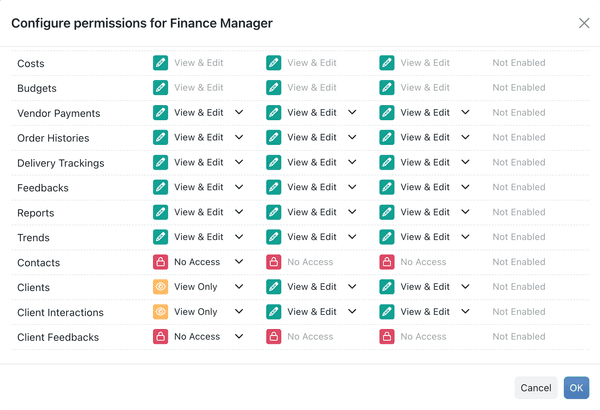
Permissions define what each role can do within Kinabase. For example, you may allow your 'Sales' role to view and edit 'Leads' and 'Clients', while 'No Access' to your 'Financial' collections.
Adjust Permissions in Roles
Open the Role
Under Settings → Organisation → Roles, select (⋯) next to the role, then choose Edit Permissions.Set Access Levels
For each collection, click 'View & Edit', 'View Only', or 'No Access'. You can also allow tasksTask, activitiesSomething that needs to be done. Create and assign tasks to yourself or others, often linked to a specific Record.Activity, importsA log of what's happened. This could be an event or note related to a Record, such as an email, call, or meeting.Import, or other special features on a per-role basis.The process of bringing external data into Kinabase, typically from CSV or spreadsheet files.Save
Click OK to confirm changes.
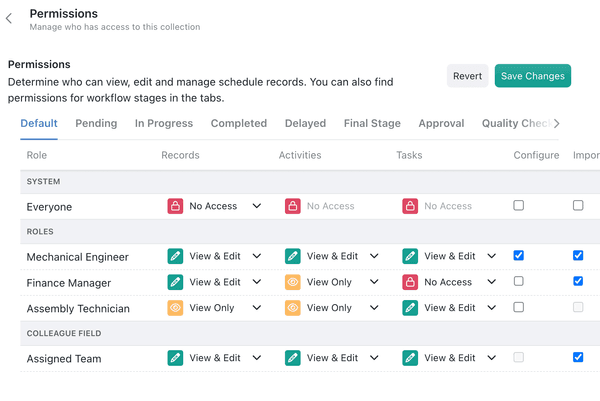
Fine-Tuning at the Collection Level
If you need more granularity, open a collection's Configure panel (via ⋯ in the collection toolbar or sidebar) to restrict or expand role-specific access - right down to field-level permissions.
3. Balancing 'Everyone' vs. Specific Roles
Kinabase includes an 'Everyone' role by default.
We recommend setting minimal privileges here - like 'View Only' or 'No Access' - and then granting more specific privileges through roles like 'Engineering', 'Sales', or 'Marketing'.
This approach maintains a secure baseline while preventing accidental overexposure of sensitive data.
See the guide on User Types for more details on how to set up your Kinabase workspace.
By assigning roles strategically, you can fine-tune access without compromising security.
If you need help or have questions, our Cambridge-based team is here to assist.