Managing Your Profile
Keeping Your Information Up to Date
Your Profile settings in Kinabase store your personal information—like your name, profile photo, and email addresses—so you can stay up to date with important notifications
While System Admins add users to Kinabase, you can still edit your own profile to keep everything accurate.
Accessing Your Profile Settings
- Click your name at the bottom-left of the navigation sidebar
- Select Settings from the menu
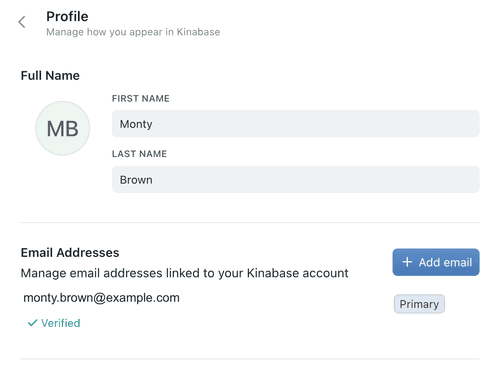
- Go to Profile—this is where you'll find your name, photo, and linked email addresses
Uploading a Profile Photo
Your profile photo displays throughout Kinabase wherever your name appears: in the navigation sidebar, the Colleagues list, task
Adding or changing your photo
- In the Profile section, hover over the avatar circle
- Click the camera icon that appears
- Choose an image file from your device (maximum 5MB, any common image format)
- Your photo updates instantly across the application
Automatic sync from Microsoft 365
If your workspace has Microsoft 365 integration enabled, your profile photo may be imported automatically:
- During user sync: When an administrator syncs users from Microsoft 365, profile photos are imported alongside other user details
- On sign-in: If you sign in with your Microsoft account and don't have a photo set, Kinabase retrieves your Microsoft 365 profile photo automatically
You can upload a custom photo at any time to override the synced image.
Removing your photo
- Hover over your current profile photo
- Click the red delete button that appears in the top-right corner
- Confirm the removal when prompted
Updating Your Name
In the Profile section, enter or update your First Name and Last Name. These details appear to other users within Kinabase when viewing tasks
Managing Email Addresses
Kinabase lets you manage multiple email addresses from a single account. For example, you might link a second email if you have both work and personal addresses.
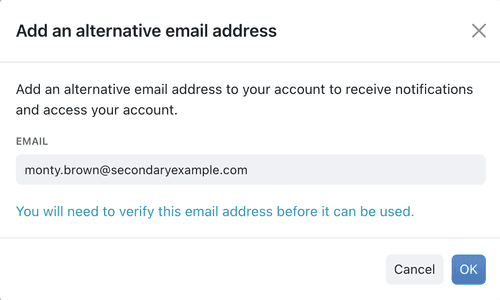
Adding a new email
- Click Add Email in your Profile
- Enter the new address
- Check your inbox for a verification link
- Click the link to verify and start using the email in Kinabase
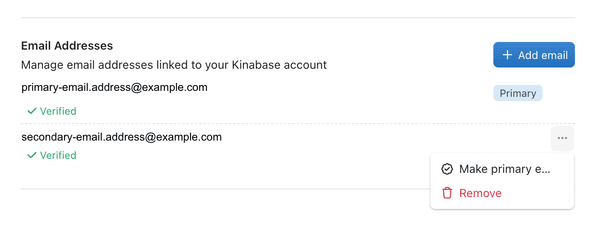
Removing an email
- Locate the email address in your Profile list
- Click the options menu (⋯) next to that email
- Select Remove
Setting a primary email
Your primary email is where Kinabase sends essential notifications—like password resets or important system alerts.
- Find the email you want to set as primary
- Click the options menu (⋯) beside it
- Select Make Primary
Always keep at least one verified email active so you don't miss any updates or password recovery emails.
Keeping your Profile up to date ensures smooth communications within Kinabase, and quick recovery options if you ever lose account access.
If you run into any issues, reach out to your System Admin or our Support Team.