Finding and Filtering Records
Master the art of finding, filtering, and organising your records
As your Kinabase grows, it's important to quickly pinpoint the information you need.
1. Finding Records
AI-Powered Global Search
Access the Search Bar:
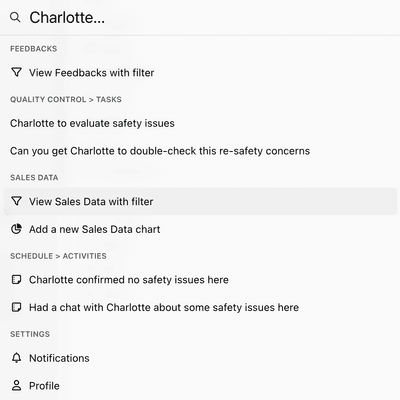
At the top of the sidebar, click on the AI-powered search bar.Enter Your Query:
Type a keyword, name, or phrase (e.g., 'Alex' or 'Project Apollo'). As you type, results across all collectionsCollectionwill appear dynamically.A list of records in Kinabase, similar to a table in a spreadsheet or database.Select a Record
Click on the desired result to jump directly to that record's detailed viewRecord:An individual entry within a Collection, like a row in a database table, representing one item or entity.View.A customised display of Records in a Collection, defined by filters, sorting, grouping, and visible Fields.
Use quotation marks (e.g.,
"Exact Name") to search for exact matches.
Collection-Based Search
Search a Collection:
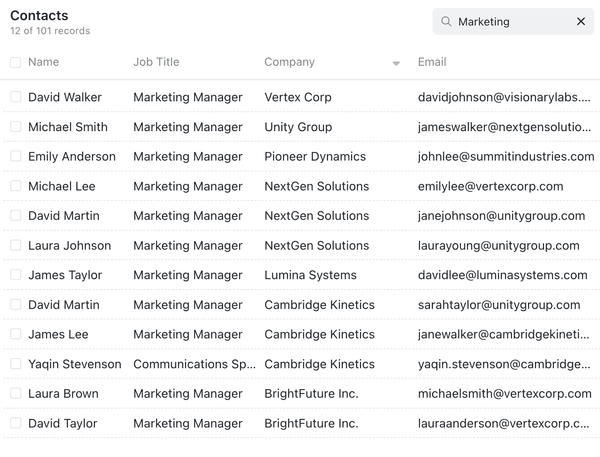
Navigate to the collection using the sidebar.Use the Local Search Box:
In the top-right corner of the collection, type your query. Results within that collection will show immediately.Clear the Search:
Click the 'X' in the search box to reset and view all records.
2. Filtering Records
Filters
If you'd like to save your filter settings for future use, you need to create a View
Viewinstead. Please read our next section on how to do this.A customised display of Records in a Collection, defined by filters, sorting, grouping, and visible Fields.
Manually Applying Filters
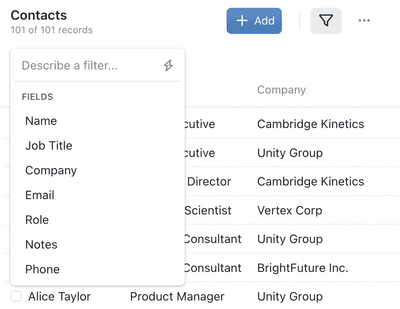
Add a Filter:
Within a collection, click the filter icon and + Add Filter button near the top of the screen.Select a Field
Choose the field you want to filter by (e.g., 'Status' or 'Priority).Field:A column in a Collection that stores a specific type of information for each Record, such as text, number, or date.Set Filter Conditions:
Define your criteria (e.g., 'Status = Active' or 'Priority = High').View Results:
As you set the condition, the list updates to display only matching records.Combine Multiple Filters:
Add additional filters (e.g., 'Due Date is Today') to refine your results further.
You can even filter by the character count of text fields.
Simply click the 'Field Name - Length' option from the dropdown.
Filtering by Hierarchical Relationships
When a record is linked to other records in the same collection, you can filter records by which other records they connect to. Look for relationship options in the filter dropdown options such as Has Parent, Is Parent of, or Is Field of Collection.
Choose a relationship-based option:
In the Add Filter dropdown options, pick a connection such as Has Parent to find records linked through a particular field.Select your starting records:
Search for and tick up to 500 records that anchor the filter.Walk the hierarchy with Match at any level:
When the relationship points back to the same collection (such as a Parent Project or Manager field), tick Match at any level to include indirect connections through chains of that relationship.Apply the filter:
Click Add to apply a new filter, or Save when editing an existing one. The filter box summarises the rule, for example "Parent is Project Alpha at any level".
Hierarchical filters work the same way in views, reports, dashboards, and automation conditions.
Using AI-Powered Filters
Type Your Filter Query:
In the search bar at the top, describe what you're looking for in plain language (e.g., 'show me the active projects due this week').Automatic Filter Creation:
Kinabase's AI interprets your input and applies the appropriate filter.Review Filtered Records:
The records that match your description appear instantly.
Grouping records
Groups allow you to quickly cluster records by a specific field - like workflow
3. Creating Views
Views

Creating a New View
Open a Collection Configuration:
Click the ⋯ (options menu) in the top-right of the collection view, or right-click the collection name in the sidebar and select Configure.Go to the Views Tab:
In the configuration panel, select the Views tab.Add a New View:
Click + Add View.Customise Your View:
- Name Your View: Give it a descriptive name
(e.g., 'Overdue Checks', or 'High-Priority Projects'). - Set an icon: Give your view an icon for extra ease of use.
- Select Visible Fields: Optionally, choose which fields to display.
- Set Filters: Apply the filters you want to include.
- Sort Data: Choose a field and set your desired order
(e.g., sort by 'Due Date' in ascending order). - Group Data: Choose a field to group your records.
- Name Your View: Give it a descriptive name
Save Your View:
Click +Add next to your new view's name.
Your new View will now be available as an option from the collection's Views menu.
Views are most powerful when you create multiple for different needs or users. If you only create one View, this will be the default. Sometimes its useful to create an 'Show All R' view.
Using Saved Views
Switch Views Easily:
Access the Views menu within the collection to quickly switch between different saved views.Maintain Consistency:
Share your custom views with your team so everyone sees the same filtered data, improving collaboration.
It's a good idea to create a 'Show All' view with no filters, so you always have a way to see every record in a collection.
Best Practices
Save Frequently Used Filters as Views.
This avoids repeating the filtering process every time.Name Views Clearly.
Descriptive names help you and your team quickly identify the purpose of each view.Give Your Views an Icon.
Humans are visual creatures, use an icon for extra explanatory power.
Using search, filters, and views lets you quickly find the information you need in Kinabase - improving productivity and keeping your data organised.
If you need further assistance, our Support Hub and your System Admin are here to help.