
Adding Unique Identifiers
Assign distinct codes to your records
A unique identifier gives every Record PR-001 or INV-152, so you can locate, reference and track entries with certainty even when their names look similar.
1. Why use unique identifiers
2. Choosing an identifier type
1. Open collection configuration
Open the options menu (⋯) in the top-right of the collection screen and select Configure, or right-click the collection name in the sidebar and select Configure.
2. Go to Details
Under Setup, click Details, then find the Identifiers section.
3. Choose a Type
Select None, Number, Abbreviation, or Custom. Each type has its own options, described below.
4. Save
Click Update to confirm. New records from this point on include an ID in the format you chose.
You'll need Configure Permission
Permissionfor this collection to change identifier settings. If you're unsure, ask your System admin.The level of access — No Access, View Only, View & Edit or Not Enabled — granted through a Role for a specific area of Kinabase, such as records, tasks or configuration.
Number
Sequential, auto-incrementing IDs.
- Prefix - a short label for the collection, e.g.
PR,IMG,INV. - Minimum Digits - how many digits follow the prefix, from 0 to 7 (e.g. 3 digits gives 001, 002, 003).
- Next ID - the starting number for the next new record, useful when migrating existing IDs.
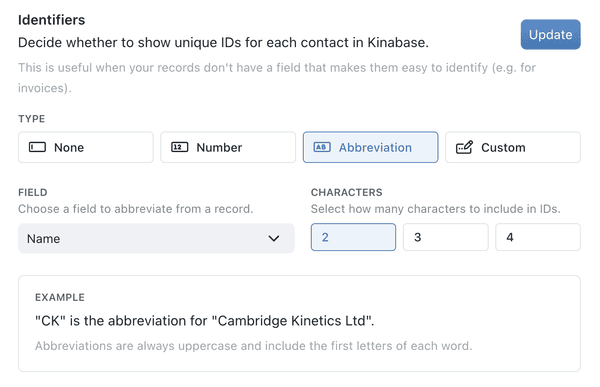
Abbreviation
An ID built from letters taken from one of the record's own fields.
- Field - the field to abbreviate, e.g. Name.
- Characters - how many characters to include: 2, 3 or 4.
- Include numbers in abbreviations - optionally add digits to keep abbreviations unique when names clash.
- A live Example shows the format as you configure it, e.g.
"CK" is the abbreviation for "Cambridge Kinetics Ltd".
Custom
A free-form builder that combines fixed text, an auto-incrementing number, and parts of other fields - for example PROJ-{abbreviation of client name}-0001. A live Example preview updates as you build the format.
Changing the ID format after records already exist prompts a warning, since it can rewrite existing record IDs. You can't turn identifiers off while the ID field is set as the collection's Primary Field.
3. Primary and secondary fields
The Primary Field and Secondary Field are separate from the ID, but often shown alongside it. The Primary Field is the field Kinabase uses to identify a record - it's shown as the record's title everywhere in the app. The Secondary Field displays alongside the primary field for extra context, for example a company name next to a contact's name.
1. Open the Fields pane
In collection configuration, under Setup, click Fields.
2. Set the Primary Field
Find the field you want as the record title and mark it as the Primary field.
3. Set the Secondary Field (optional)
Mark a second field as the Secondary field to show alongside it for context.
An identifier gives a record a unique code; the primary field gives it a human-readable name. Most collections use both - for example, an Invoices collection might show "Acme Ltd" as the primary field and
INV-0142as its identifier.
4. Identifiers on lists
A Collection List
1. Open the list's configuration
Open the parent collection's configuration and select the list under Lists.
2. Go to Identifiers
Click the Identifiers tab, which appears once the list has been created.
3. Choose a type
Select Number, Abbreviation, or Custom, then set the prefix, minimum digits or other options for the type you chose.
4. Save
Click Update. New list items receive IDs automatically from this point on, and the ID column appears in record tables straight away, including in portal views.
In portals, list item IDs appear in tables but are hidden from add and edit forms, since IDs are generated on the server.
5. Migrating existing IDs
If you're moving from another system and want to keep your existing numbering scheme:
1. Set the prefix
Match your old format, e.g. IMG.
2. Adjust Next ID
Set it to one higher than your last used number, e.g. 153 if your last record was 152.
3. Save your changes
New records continue the numbering without creating duplicates.
Once a record is created, its ID doesn't change, even if its fields are edited later. Plan your format carefully if you have existing data or a legacy numbering system to align with.
Configuring unique identifiers keeps large collections organised and makes every record easy to find, reference and track, even as your data grows.
Need more help? Ask your System admin, or contact our support team via Help & Support.