Linked Collection Fields
Establish Relationships Between Collections
Linked Collection
They display the primary field
How to Set Up a Linked Collection Field
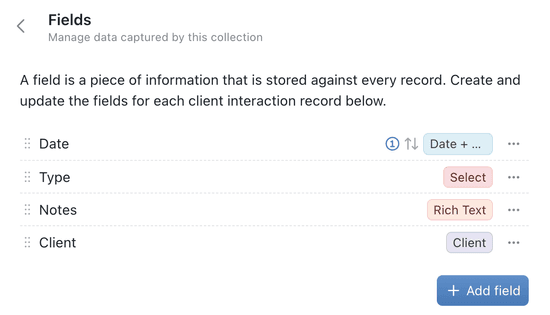
1. Access Field Settings
1. Open the Collection:
Select the collection you want to modify from the sidebar.
2. Go to 'Configure':
Click the ⋯ (options menu) in the top-right corner and select Configure, or right-click the collection name in the sidebar and choose Configure.
3. Select 'Fields':
In the configuration window, click the Fields tab to view all existing fields.
You need Configure permissions
Permissionto adjust collection settings. If you're unsure, ask your System Admin.A specific right to view, edit, delete, or administer parts of Kinabase, granted via Roles.
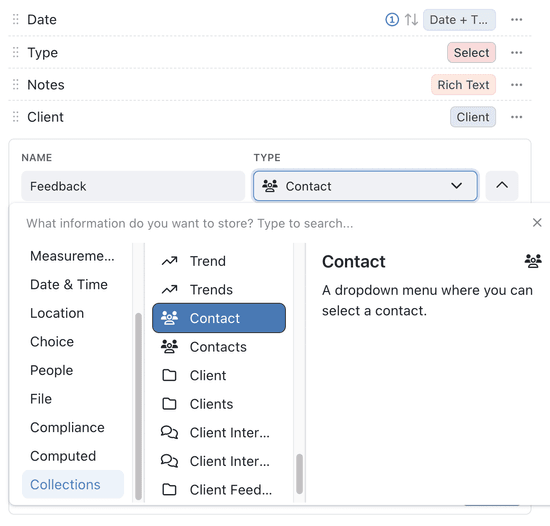
2. Create a New Linked Collection Field
1. Click 'Add Field':
This opens the field creation form.
2. Enter Field Details:
- Field Name: Provide a descriptive name (e.g., 'Primary Contact').
- Field Type: In the Type dropdown, scroll to the Collections section and select the collection you want to link to.
- Select the Singular or Plural version:
- Singular: Links a single record.
- Plural: Allows linking of multiple records.
3. Save Your Field:
Click Add Field to create the new Linked Field. The field will now display the primary field value from the linked collection when you add or edit a record.
Advanced Linked Collection Field Settings
Image Thumbnails
Kinabase now supports displaying image thumbnails in Linked Collection Fields, making it easier to identify records visually.
Please note: you must have an image field on the linked records.
1. Edit Your Linked Collection Field:
- In the field settings (accessed via the Configure → Fields pane), find your linked collection field & click edit.
2. Define your Input settings:
- Navigate to the 'Input' tab and choose the option 'Image Thumbnail'.
- Pick the image field on your linked collection that you would like to show.
- Save your changes to the field.
3. Using Image Thumbnails:
- Now when users open the dropdown, a list of thumbnails appears – click any image to select its record.
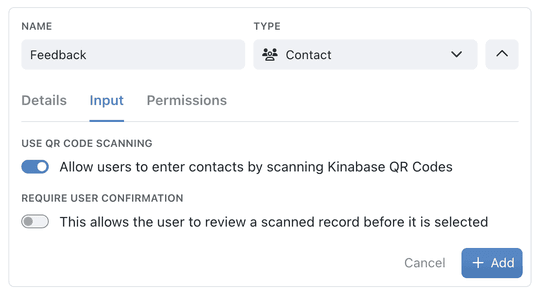
Enabling QR Code Scanning
Kinabase supports QR code scanning for Linked Collection Fields to make data entry even faster:
1. Edit Your Linked Collection Field:
In the field settings (accessed via the Configure → Fields pane), navigate to 'Input' and locate the option 'Use QR Code Scanning' and toggle it On.
2. Optional Confirmation:
Toggle 'Require User Confirmation' if you want an extra prompt before finalising a scan.
3. Using QR Scanning:
When adding or editing a record, click the QR icon next to the Linked Field. Your device's camera will open, allowing you to scan a QR code that automatically fills in the linked field.
Tips for Using Linked Collection Fields
Singular vs. Plural:
Use a singular linked collection field for one-to-one relationships (e.g., one primary contact per account) and a plural linked collection field for one-to-many relationships (e.g., multiple related projects).Navigation:
The value displayed in a Linked Field is clickable, allowing you to quickly navigate to the corresponding record in the linked collection.Advanced Filtering:
If both collections share a common field (e.g., Country), you can configure filtering options to narrow down the records displayed in the dropdown.
By using Linked Collection Fields, you create a powerful, relational database that connects your collections seamlessly - streamlining data entry, ensuring consistency, and enhancing navigation across your Kinabase environment.
If you have any questions, our Support Hub is here to help.