
Making an API Call
Send data from Kinabase to another system
The Make an API call Step
You can set this step up yourself. Everything you need to enter - the address to call, the credentials, the shape of the request - comes from the other service's own API documentation, so have that to hand before you start.
Automations are built under Settings → Operations → Automations. You'll need to be a System admin.
The Make an API call step is available on the Max plan.
1. Before you start
Find the external service's API documentation and note down four things:
- The endpoint URL to call, and the method it expects.
- Any headers it needs, especially how it wants you to authenticate.
- The request format - whether it expects plain text or structured JSON, and which fields it requires.
- An example response, if you plan to use anything the service sends back.
If the service belongs to a supplier or partner, ask whoever looks after it for these details and for a test endpoint to try first.
This step sends requests out of Kinabase, and an event in another system cannot currently start a Kinabase automation. You also cannot use it to call the Kinabase API itself - to let an external system read or write your Kinabase data, register an integration instead. See The Kinabase API.
2. Add the step and set the request
1. Add the step to your automation
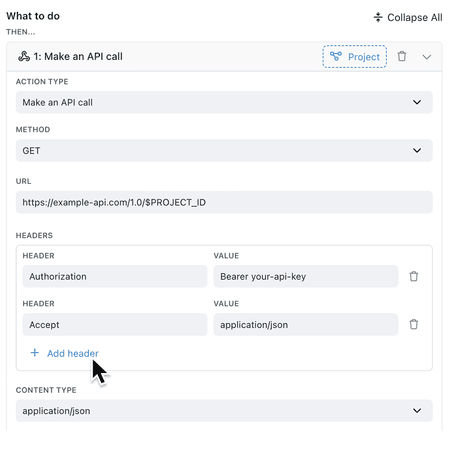
Open your automation, and under What to do click Add step. Under Action Type, select Make an API call.
2. Select the Method
Under Method, select what the endpoint expects.
| Method | What it's normally for |
|---|---|
| GET | Retrieves information. |
| POST | Sends something new, or creates a new item. |
| PUT | Replaces an existing item. |
| PATCH | Updates selected details of an existing item. |
| DELETE | Removes an item. |
These are the standard conventions, but the external service's documentation is always the authority. If it says to POST to an endpoint that sounds like an update, follow the documentation.
3. Enter the URL
In URL, enter the complete endpoint, for example https://api.example.com/v1/customers.
The URL can include values from the Record $ to open the field suggestions and select the one you need - so a per-customer endpoint becomes https://api.example.com/v1/customers/$CUSTOMER_ID. See computed fields for how Expression
3. Add headers
Headers carry extra instructions and credentials alongside the request. Click Add header and enter each one as a separate Header name and Value. The service's documentation tells you which it needs; these three are the most common.
| Header | Example value | What it does |
|---|---|---|
Authorization | Bearer your-token | Authenticates the request with a token or key. |
X-API-Key | Your API key | An alternative authentication style used by some services. |
Accept | application/json | Tells the service what format you want the reply in. |
Header values can include $ expressions, just like the URL.
Header names cannot contain spaces. You don't normally need to add
Content-Typeyourself - Kinabase sets it from the step's Content Type selection, described next.
4. Build the request body
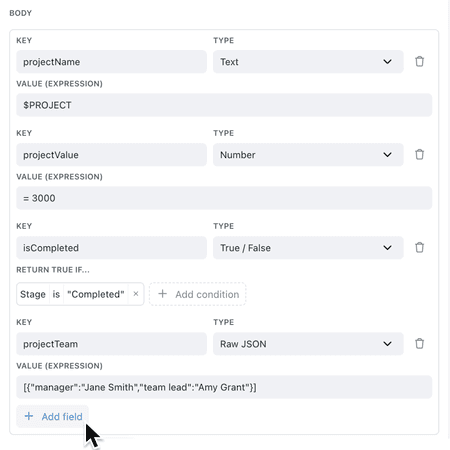
Under Content Type, select the format the endpoint expects: text/plain for a single block of text, or application/json for structured data. Most modern services expect JSON.
Sending plain text
Select text/plain and enter the message directly. Insert record values with $, for example Order $ORDER_NUMBER is ready for collection.
Sending JSON
Select application/json, then add each top-level field of the body as a row. Give the row the key the service expects, then select the type of value you're sending.
| Value type | Sends | Example |
|---|---|---|
| Text | A JSON string. | Key customerName, value $CUSTOMER_NAME |
| Number | A number, and accepts a formula. | Key amount, value $TOTAL |
| True / False | true or false, decided by conditions you set. | Key isPriority, true when Priority is High |
| Raw JSON | A nested object or array, exactly as you type it. | Key items, value [{"sku":"ABC","quantity":2}] |
With Raw JSON, don't wrap the value in quotation marks - Kinabase inserts it into the body as-is. Quoting it would send it as a string rather than as an object or array.
5. Capture values from the response
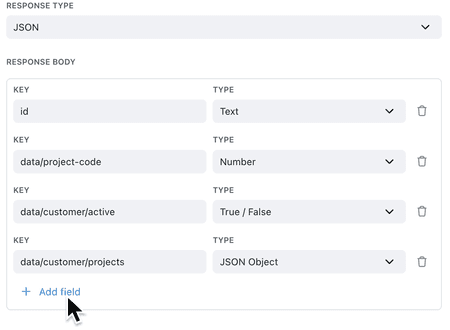
You only need to set Response Type if later steps use information the service sends back - otherwise Kinabase makes the call and moves on to the next step.
Text
Select Text to save the complete response body as one value, available to later steps as $RESPONSE:TEXT. This is the quickest option when the reply is short, or when you only want to record it.
JSON
Select JSON and add a row for each value you want to pull out of the reply. For each row, enter the path to the value and select its type - Text, Number or True / False. Given this response:
{
  "data": {
    "customer": { "name": "Ada", "active": true },
    "orders": [{ "id": "O-100", "total": 24.5 }]
  }
}
you would add:
| Path | Type | Value it captures |
|---|---|---|
/data/customer/name | Text | Ada |
/data/customer/active | True / False | true |
/data/orders/0/total | Number | 24.5 |
Separate each level of the response with /. Items in an array are numbered from 0, so the first order is /data/orders/0. The leading / is optional in the editor.
6. Use the response in later steps
Captured values behave like any other value in the automation.
- In expression fields - type
$RESPONSE:and select the value you captured, for example$RESPONSE:DATA_CUSTOMER_NAME. Select it from the suggestions rather than typing the name by hand. - In record assignments - when a later step sets a Field Field, the same values appear under Copy Values → API call response.A single piece of information stored on every record in a Collection, such as text, a number or a date, similar to a column in a spreadsheet.
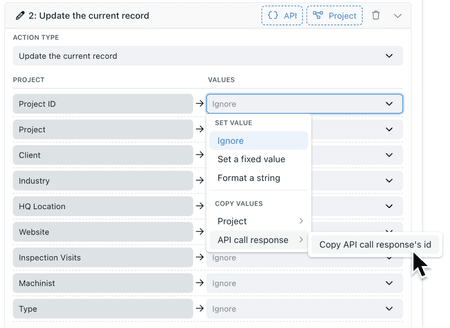
You can use them in emails, notifications, conditions, formulas, URLs, headers, and the body of a later API call - so one call's reply can shape the next one.
7. Test the step
Run the automation against a single record you know the expected outcome for, then open the automation's History tab. Expand the dated run and find the step entry ending Make an API call.
The concise outcome stays beside the step. Open Details to inspect the longer diagnostic information. When both are available, use the Response and Request tabs:
- Response shows the HTTP status and any available response body.
- Request shows the method, URL, content type, body, and non-content header names. Header values are shown as
[hidden].
Select Copy details to copy the open tab. If a network problem prevents a response, Kinabase shows Request details without tabs. Request and response bodies are limited to 3,000 characters in the stored log.
Common things to check:
- The URL is complete, including
https://and any version segment such as/v1. - The authentication header name and value match the service's documentation exactly.
- The Content Type matches what the endpoint expects.
- Required body fields are all present, and numbers aren't being sent as text.
See Managing Automations for the full run history, statuses and troubleshooting steps.
Need more help? Ask your System admin, or contact our support team via Help & Support.