
Saved Views
Save, default and share your views with your team
Once you've built a filter, sort and grouping you'll want again, save it as a View
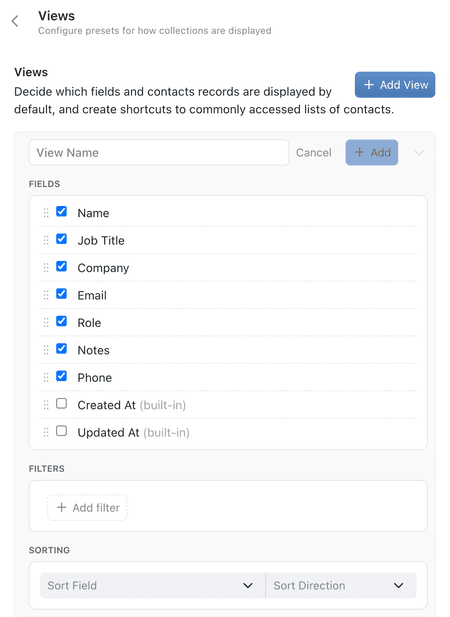
1. What a saved view stores
A view remembers:
- Name and icon, so it's easy to recognise in the view list.
- Fields - which columns are visible, and in what order.
- Filters - the conditions records must match. See Filters and sorting.
- Sorting - the sort field and direction.
- Grouping - the group field and, for dates, its precision.
- Permissions - who can see the view.
Switching the display mode from the toolbar is temporary. To make a display mode such as Kanban part of the view, select Set as view default, or set Display when you configure the view. See Views for the four display modes.
Column widths aren't stored on the view either. They're saved in your browser for that view, so other people keep their own layout. See Finding and Filtering Records.
2. Creating a view
You'll need Configure Permission
Permissionfor this collection to create or edit a shared view. Anyone with access to the collection can create a personal view for themselves.The level of access — No Access, View Only, View & Edit or Not Enabled — granted through a Role for a specific area of Kinabase, such as records, tasks or configuration.
1. Open collection configuration
Open the options menu (⋯) in the top-right of the collection screen and select Configure, or right-click the collection name in the sidebar and select Configure.
2. Go to Views
Under Display, click Views.
3. Add a view
Click Add View.
4. Configure the view
- Name - a descriptive name, e.g. "Overdue Checks" or "High-Priority Projects".
- Icon - pick one to help the view stand out in the list.
- Fields - tick which fields to show, and drag to reorder them.
- Filters - add the conditions to apply.
- Sorting - choose a sort field and direction.
- Grouping - choose a group field, if any.
- Permissions - choose who can see this view: everyone, specific roles, or just you.
5. Save
Click Add next to the view's name. It now appears as an option in the collection's view list.
Permissions can't be configured for the default view - it's visible to everyone who can see the collection.
Creating a view from a type
If the collection has Types
1. Open Types
In collection configuration, under Setup, click Types.
2. Open a type's menu
Click the ⋯ menu next to the type you want a view for.
3. Create the view
Select Create View. Kinabase creates a view already filtered to that type, showing the fields relevant to it.
3. Using and switching views
Click the view's icon and name at the top of the collection to switch views. Each entry in the list shows its icon, name and record count.
If no view is set as the default, Kinabase automatically loads a built-in "All" view with no filters, so there's always a way to see every record.
It's still worth creating your own "Show All" view with no filters if you want one you can rename, reorder, or otherwise customise - the built-in "All" view is a fallback, not something you configure.
4. Setting a default and sharing views
1. Open the view's menu
In the Views configuration pane, open the ⋯ menu next to a view.
2. Choose an action
Select Show by default to make it the view everyone lands on first, Duplicate to use it as a starting point for a new view, or Delete to remove it.
3. Control who sees it
Set the view's Permissions to Everyone, specific roles, or Just me for a personal view only you can see. There's no public link sharing for views - for records you need to share outside your organisation, use a Portal instead.
Views are most useful once you have several - one for each way your team needs to look at a collection. Name them clearly, give each one an icon, and share the ones your whole team should use.
Need more help? Ask your System admin, or contact our support team via Help & Support.